Showing posts with label ground turkey. Show all posts

Wednesday, 9 November 2016

Pumpkin Chili


This recipe was DELICIOUS and kid friendly (at least in my house!). I adapted it from Katie Farrell's, "Devotions for a Healthier You." She is the author of a lovely cookbook called, "Dashing Dish!" I follow both Katie and her sister Sarah Robbins on Instagram!

I chose the slow cooker option and made it with ground chicken.  The original recipe calls for lean ground turkey or lean ground beef so if you have other preferences then go with what you enjoy! I personally try to limit my red meat intake to only 2-3x per week.

I did double the batch so that I can have some to freeze for a later date. I found this recipe so light!  Even if you aren't a pumpkin fan, I think you would like this dish.  It was like a lighter, creamier chili. The only complaint I had from my hubby was that it could have had a little more chili powder but I didn't want to over do it for my 4 year old son's sake.

Ingredients:

1 pound ground turkey
1 (15oz) can of pumpkin
1 (15oz) black beans
1 (14.5oz) can of diced tomatoes, drained (I actually forgot to drain them and it still turned out delish!)
1 cup of low sodium chicken broth
1 small-medium onion, diced
1 medium bell pepper ( I chose red! Original recipe calls for yellow)
1 1/2 Tbsp chili powder
1 tsp garlic powder (or 2 tsp fresh chopped garlic)
1/2tsp pepper
1/2 tsp salt
2 Tbsp honey **optional ( I did add this!)

Directions:
Add ground chicken to slow cooker and make sure to break it up with a spatula.
Add additional ingredients to the slow cooker and stir until everything is well combined.  Put the cover on the slow cooker and cook for 4 hrs on high or 8hrs on low heat.

Garnish with mozzarella or cheddar cheese if you wish! Enjoy!

Sunday, 24 July 2016

3 Day Quick Fix


Ok!  Believe it or not, I have never done the 3 Day Quick Fix that is included in the 21 Day Fix program when you purchase it! This is different than the 3 Day Refresh that I have done in the past. You can check out that blog post here.   That is a separate When I first began this journey I lost 9 pounds in 21 days alone so I guess it wasn't on the top of my priority list with everything else I had changed as I felt I had lost enough weight at the time.

Since having my second baby though and having less weight to lose, this challenge has been a bit more difficult in seeing fast results.  So in a crunch to lose some weight fast for an upcoming wedding, I thought I would give it a chance and it actually wasn't as hard as I thought!  So check it out and see if it is something that is for you!

The 3 Day Fix can be used as needed (but not recommended for any longer than 3 days) OR it is a good way to integrate into the end of completing the 21 Day Fix beginning with Day 19.

The PLAN:
~ Eat 6 meals per day according to the plan mapped out for you.
~Space each meal 2 hours apart.
~Drink 3.6 litres of water!
~NO SALT!  Lemon/lime juice, vinegars and spices are ok.
~Cinnamon, nutmeg or 1 tsp stevia is ok with morning oatmeal
~Drink 1 tsp of extra virgin coconut oil with meals.
~Coffee/Tea is ok -- black only and you may use 1 tsp of stevia if need be.
~You can continue your workouts!


The first thing I did was make my meal plan for the 3 days!
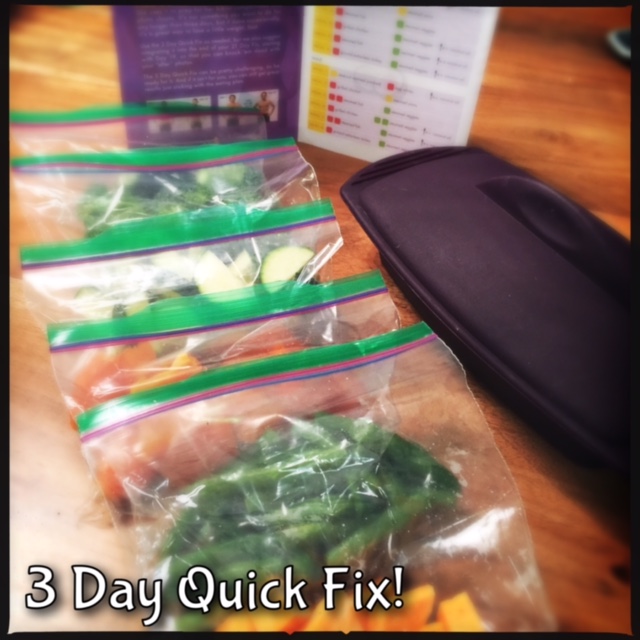

2. PREP
I prepped all the vegetables and all of the protein for the entire three days! I put each portion of veggies and meat into their own little ziploc bags to make for quick and easy retrieval in case my day got busy.


3.  Then I put all the veggies for each day into a larger ziploc bag and put it in the crisper in my refrigerator. I have to tell you this was a life saver having it all prepared!


Breakfast for me was the most difficult!  The plan calls for (1/2c) steel-cut oatmeal and egg whites (8 but I only did 5) and 1 tsp of EV Coconut oil to drink.  Seriously, what is oatmeal without a little maple syrup?  Ha ha!  I did get it down with the help of cinnamon being sprinkled on it but it was hard!


The rest of the meals were pretty repetitive. They alternated between fish or chicken and ground turkey for the last meal.  For Meal 2 - it included grilled chicken (3/4 c.) and steamed yams (1/4 c.). This was probably one of my fave meals throughout the 3 days!


Water is a HUGE part of the 3 days --- to the tune of drinking at least a gallon!!!  To make it seem like I wasn't over doing it, I purchased a bottle of water that was 1 litre and kept refiling it. It was nice because I knew I only had to drink 4 of them!


My EPICURE silicon steamer was phenomenal for getting me through the meals. It took only 1 min 30 seconds to heat up my veggies!  The last day I had to cook more chicken and it cooked a frozen chicken breast in less than 5 minutes!!!


If I had a "do-over" I would make sure that I was home to do this!  On Day #2 I had errands to run so wasn't consistent in getting the two morning meals after breakfast in, so I did miss a protein and a veggie that day, but I got all the rest in!

RESULTS! .... So my first round post baby in 21 Days and ending with the 3 Day Quick Fix resulted in 5 POUNDS and 7 INCHES GONE!!!!!!!   I still have a ways to go, but continuing on my journey!


If you are interested in trying out an accountability group with me then please contact me via email: sasijewelry@gmail.com or find me on Facebook

Wednesday, 6 April 2016

Taco Zucchini Boats


 Taco zucchini boats are going down in my recipe book as another family favourite in my household for many reasons!  A. The boys thought they were delicious and cleaned their plates and B. it was SO quick an easy that they took no time to make--so that made me happy! I found the recipe while doing meal prep on the road as the hubby was driving and made note.  I have to give credit to the author Gina Homolka of the "skinnytaste" website (www.skinnytaste.com) for this recipe!

Typically I use ground chicken or turkey in any recipe that now calls for ground beef but this night, I did choose to use ground beef.  We typically only eat red meat 2x a week since we have changed our diet so this was a nice treat!  I hope you and your family enjoy!

Ingredients:
4 medium zucchinis, cut in half lengthwise
1/2 cup mild salsa (I used my homemade salsa)
1b lean ground chicken, turkey or beef

Taco Seasoning:
1 tsp or each: garlic powder, chili powder, cumin, paprika and himalayan pink or sea salt ground (or to taste)
1/2 tsp oregano

1/2 small onion, chopped finely
2 tbsp green or red bell pepper, chopped finely
4 oz can of tomato sauce
1/4 cup water
1/2 cup grated cheese of your choice (I used marble)
1/4 cup chopped green onion (or cilantro would be good too!)

OPTIONAL INGREDIENTS for Toppings:
Greek yogurt in place of sour cream
Guacamole
Additional Salsa
Jalapeños

Before you get started:
Preheat oven to 400°F.
Bring a large pot of salted water to a boil.
Place the 1/2 cup of salsa on the bottom of a large glass baking dish.

Directions:
Using a small spoon, hollow out the seedy centre of each of the zucchini halves. Make sure that you still leave a thick skin on each half.  Chop up the scooped flesh of the zucchini in small pieces reserve 3/4 cup of what you have chopped--this will be used to add to the taco filling. Either discard or save the rest of the zucchini flesh for another recipe.  Using a cheese cloth or even a paper towl, squeeze the excess water out of the 3/4 cup of zucchini flesh that you have saved.


Drop zucchini halves in boiling water and cook 1-2 minutes depending how thick they are and then immediately remove them from the water and place them in the baking dish on top of the salsa.

Brown ground chicken, turkey or beef in a large frying pan or skillet making sure to break it up as it cooks.  When the meat is no longer pink, add the spices, onion, bell pepper, reserved zucchini, tomato sauce and water and stir well.  Cover and simmer on low for an additional 20 minutes


Once the taco meat is finished then fill the hollowed zucchini boats with the meat mixture using a spoon and pressing firmly until all the meat has been used up.


Top each boat with 1tbsp of shredded cheese or to your desire.  Cover with foil and bake for approx. 35 minutes until the cheese has melted and the zucchini is cooked through.


Top with scallions and serve with salsa and/or additional toppings!

21 Day Fix equivalents without any additional toppings
2 zucchini boats = 2 green, 1 red, 1 blue, 1 orange, 1/2 purple (if you added extra salsa on the side at your discretion).

Tuesday, 19 January 2016

Mini Mexican Pizzas


Good grief, I think I must be on a "muffin tin" cooking kick the last little bit! ha ha  But in all honesty, little "bite size" delights are so easy to serve and re-heat! PERFECT for moms who like to meal prep, or have meals prepared in advance before the crazy work week begins. I am sure they would be delicious after you froze them too.  This recipe came from the newest cookbook to grace my pantry shelves from Katie Farrell, creator of "Dashing Dish."  While my little delights didn't turn out as pretty as hers, they were delicious nonetheless.  So delish, I am making them again next week!

I did make modifications to the original recipe in the cookbook some things I would keep the same and others I would change.  For example I used Ezekiel wraps.  Here they can only be found in the frozen section at our local grocery store.  When they thawed I found them thin and they cracked a little when I tried to place them in the muffin tins.  I would opt for whole grain or whole wheat wraps next time.

I also used ground chicken instead of ground turkey. I don't know if it is this pregnancy or what, but I can't seem to stomach ground turkey so ground chicken it is!!!

I also stuffed each little pizza shell without having cooked the chicken first (only because I looked at the recipe much too fast).  If you decide to use this method, make sure you preheat the oven to 350 degrees and cook the pizza's for 40-45minutes.

Ingredients: 
~ 4 large whole wheat tortillas, or big enough to cut out 12 small circles.
~ 1 pound of lean ground chicken cooked (raw is fine, but you will have to cook longer. See notes above!)
~1/2 cup of salsa of your choice
~2 tsp of taco seasoning (I used the Epicure brand to avoid sodium but you can also make your own. I would avoid using pre-packaged taco seasoning).
1/2 cup refried beans
1/2 cup shredded marble cheese (low fat shredded Mexican blend was suggested)

Toppings: 
~Salsa
~Green onion
~Shredded lettuce (I am sure iceberg lettuce would "taste" better but I used romaine because there is no nutritional content in iceberg lettuce. I still found it great!)
~Greek yogurt
~Chopped tomatoes
~Avocado
~Sliced black olives (Yuck! ha ha, but what ever floats your boat. I did not use these!)
**If you are following the 21 Day Fix Program you will need to adjust how you use the toppings according to your meal plan. ;)

Directions:
Preheat the oven to 425 degrees. Spray a 12 cup muffin tin with coconut oil cooking spray or a spray of your choice.  Lay tortilla on a flat surface and using a round cookie cutter or a glass, cut 3-4 medium circles out of each tortilla.  Press each circle into muffing cup using your fingers. If it doesn't cover the entire side of the cup, that is ok!

In a small bowl, mix together the "cooked" ground chicken, salsa, taco seasoning and refried beans. Stir until well combined.   Scoop approx. 2 Tbsp of the meat mixture into each tortilla. Top each mini pizza evenly with shredded cheese.  Bake for 12-15 minutes or until the cheese is melted.  Wait for tortillas to cook before removing from the muffin tin.  A knife is helpful to pop out each little pizza.  Serve with the toppings of your choice and voila!

This recipe is certain to be a family favourite! Please feel free to share or pin!!!

If you are following the 21 Day Fix program, here is how it breaks down according to my best judgement... 2 mini pizza's = 1 Red, 1 Yellow, 1/3 Blue (*Toppings are additional).

Sunday, 25 October 2015

Gluten Free Turkey Meatloaf!

One of my favourite cookbooks is called, "Everyday Paleo," by Sarah Fragoso.  I have two of her cookbooks that I found at Costco a while ago and love them! I don't follow a Paleo lifestyle but the recipes are clean, fresh and super easy. This recipe is from the, "Everyday Paleo" cookbook and I changed it up tonight and used turkey instead of beef!  It is family approved!   I hope you enjoy it!


Ingredients:
~2-2.5lbs ground turkey (or lean ground beef)
~1 cup almond meal (*if you have allergies omit almond meal and only use 1 egg instead of 2)
~2 eggs
~small can of tomato paste (6 oz)
~1 small red or white onion, finely diced
~2-3 garlic cloves, minced
~1/2 tbsp pink himalayan salt (or sea salt)
~1/2 c. finely chopped fresh basil (I used 4-6 tbsp of dried basil)
~1 tsp marjoram (*optional. I have never added this ingredient)
~2 tsp finely ground black pepper

Prep Time: 30 mins             Cook Time: 1 hour          

1.  Preheat oven to 350° F.
2.  With your hands, mix all of the ingredients in a large mixing bowl  (TIP: *I like to wear rubber gloves when mixing it!)
3.  Place mixture into a large, glass baking dish.  You can use a loaf pan if you like! I actually placed mine in a 5x9 pyrex container.
4.  Bake for 1 hour (make sure the meatloaf is no longer pink in the middle and cook more if needed).


Sunday, 7 September 2014

Mason Jar Salads!


Mason Jar Salad:  Taco Salad

One of the easiest ways to stay on track during the week is being prepared with lunches.  I will be honest, there is nothing I despise more than making lunches... especially the night before! So in the spirit of meal prep, this is one of my absolute favourite things to make!

Many people ask, "but do they stay fresh all week?"  They sure do!  The trick is in layering your salads the proper way.  I will show you step by step how I do it.  This is my third week making these salads and this week I chose to do a "Taco Salad."  The great thing about this recipe is that you can add as many ingredients or as little ingredients as you like. Have fun & make it your own!

Recipe (This is for 8 salads) - I made dinner plans for one day this week so made 4 salads for me and 4 for my hubby.
  • 8 wide mouth quart size mason jars
  • 1-2 lbs ground turkey cooked 
  • 1 can black olives, drained (*optional - my hubby likes these...I do not!)
  • 1/2 can corn niblets (*optional - this was for my salads! Hubby wasn't a fan of corn)
  • 1 can black beans, drained and rinsed (*also optional.  I didn't use any in my salads)
  • 1 packet taco seasoning (low sodium or make your own!)
  • 1 jar of salsa
  • plain Greek yogurt
  • 1 quart cherry tomatoes, whole
  • 1 english cucumber, sliced
  • 1 medium chopped red onion
  • 2 chopped avocados
  • Jar of pickled jalapeños, drained (I put 5-6 in each jar)
  • 1 head of chopped romaine lettuce
  • Crushed tortilla chips (on the side!!)

Ok! Follow the steps below to make the perfect mason jar salad!  

Step One:
Put salsa in your jar first, then and add jalapeños. It is really up to you how much salsa and  
jalapeños you want to use.  Depends on your eating plan and how much you enjoy!

Step Two: 
This is where you would add your corn, black olives and black beans.  (You want to add vegetables here that would marinade well in the salsa.)


Step Three:
Add some greek yogurt! (Ideally, I should have probably added the yogurt with the salsa then the veggies on top.) I am sure it will still be fine.


Step Four:
Here I added cherry tomatoes, cucumber and red onion.

Step Five:
How about some advacado!

Step Six:
Add your COOKED ground turkey!  Make sure to make this ahead of time and let it cool before adding it to your jar.

Step Seven:
Add some cheese then lastly, add the romaine lettuce loosely to the jar.  I do not cram it in.

ENJOY!!!!  When you go to eat the salad, I like to pour it in a big bowl and add crushed up tortilla chips. If you are on the go, you could try to shake it up and just eat it with a fork.  Good luck!:) 

.